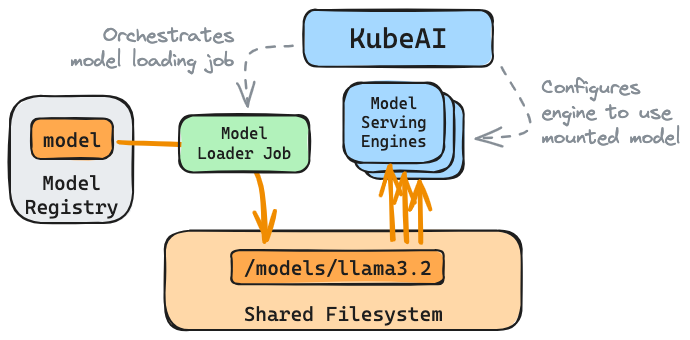
Cache models with AWS EFS
KubeAI can manage model caches. AWS EFS is supported as a pluggable backend store.

Follow the EKS install guide.
1. Create an EFS File System
Set environment variables to match your environment.
export CLUSTER_NAME="cluster-with-karpenter"
export CLUSTER_REGION="us-west-2"
Create an EFS file system in the same VPC as your EKS cluster.
vpc_id=$(aws eks describe-cluster \
    --name $CLUSTER_NAME \
    --query "cluster.resourcesVpcConfig.vpcId" \
    --output text)

cidr_range=$(aws ec2 describe-vpcs \
    --vpc-ids $vpc_id \
    --query "Vpcs[].CidrBlock" \
    --output text \
    --region ${CLUSTER_REGION})

security_group_id=$(aws ec2 create-security-group \
    --group-name MyEfsSecurityGroup \
    --description "My EFS security group" \
    --vpc-id $vpc_id \
    --output text)

aws ec2 authorize-security-group-ingress \
    --group-id $security_group_id \
    --protocol tcp \
    --port 2049 \
    --cidr $cidr_range

file_system_id=$(aws efs create-file-system \
    --region ${CLUSTER_REGION} \
    --performance-mode generalPurpose \
    --query 'FileSystemId' \
    --output text)
Expose the EFS file system to the subnets used by your EKS cluster.
SUBNETS=$(eksctl get cluster --region us-west-2 ${CLUSTER_NAME} -o json | jq -r '.[0].ResourcesVpcConfig.SubnetIds[]')

while IFS= read -r subnet; do
    echo "Creating EFS mount target in $subnet"
    aws efs create-mount-target --file-system-id $file_system_id \
      --subnet-id $subnet --security-groups $security_group_id --output text
done <<< "$SUBNETS"
2. Install the EFS CSI driver
export ROLE_NAME=AmazonEKS_EFS_CSI_DriverRole
eksctl create iamserviceaccount \
    --name efs-csi-controller-sa \
    --namespace kube-system \
    --cluster ${CLUSTER_NAME} \
    --role-name ${ROLE_NAME} \
    --role-only \
    --attach-policy-arn arn:aws:iam::aws:policy/service-role/AmazonEFSCSIDriverPolicy \
    --approve

TRUST_POLICY=$(aws iam get-role --role-name ${ROLE_NAME} \
    --query 'Role.AssumeRolePolicyDocument' --output json | \
    sed -e 's/efs-csi-controller-sa/efs-csi-*/' -e 's/StringEquals/StringLike/')

aws iam update-assume-role-policy --role-name ${ROLE_NAME} --policy-document "$TRUST_POLICY"

# Get the role ARN
EFS_ROLE_ARN=$(aws iam get-role --role-name AmazonEKS_EFS_CSI_DriverRole \
  --query 'Role.Arn' --output text)

aws eks create-addon --cluster-name $CLUSTER_NAME --addon-name aws-efs-csi-driver \
  --service-account-role-arn $EFS_ROLE_ARN
Wait for EKS Addon to active.
aws eks wait addon-active --cluster-name $CLUSTER_NAME \
  --addon-name aws-efs-csi-driver
kubectl get daemonset efs-csi-node -n kube-system
Create a storage class for using EFS dynamic mode.
kubectl apply -f - <<EOF
kind: StorageClass
apiVersion: storage.k8s.io/v1
metadata:
  name: efs-sc
provisioner: efs.csi.aws.com
parameters:
  provisioningMode: efs-ap
  fileSystemId: "${file_system_id}"
  directoryPerms: "700"
EOF
Make sure to set file_system_id match the EFS file system ID created in the first step.
3. Configure KubeAI with the EFS cache profile
You can skip this step if you've already installed KubeAI using the EKS Helm values file: values-eks.yaml.
Configure KubeAI with the efs-dynamic cache profile.
helm upgrade --install kubeai kubeai/kubeai \
  --reuse-values -f - <<EOF
cacheProfiles:
  efs-dynamic:
    sharedFilesystem:
      storageClassName: "efs-sc"
  efs-static:
    sharedFilesystem:
      persistentVolumeName: "efs-pv"
EOF
4. Configure a model to use the EFS cache
Apply a Model with cacheProfile set to efs-dynamic.
NOTE: If you already installed the models chart, you will need to edit you values file and run helm upgrade.
helm install kubeai-models kubeai/models -f - <<EOF
catalog:
  llama-3.1-8b-instruct-fp8-l4:
    enabled: true
    cacheProfile: efs-dynamic
EOF
Wait for the Model to be fully cached.
kubectl wait --timeout 10m --for=jsonpath='{.status.cache.loaded}'=true model/llama-3.1-8b-instruct-fp8-l4
This model will now be loaded from Filestore when it is served.
Troubleshooting
MountVole.SetUp failed for volume pvc deadline exceeded
kubectl get events may show an error like this:
8s Warning FailedMount pod/load-cache-llama-3.1-8b-instruct-fp8-l4-w7thh MountVolume.SetUp failed for volume "pvc-ceedb563-1e68-47fa-9d12-c697ae153d04" : rpc error: code = DeadlineExceeded desc = context deadline exceeded
Checking the logs of the EFS CSI DaemonSet may show an error like this:
kubectl logs -f efs-csi-node-4n75c -n kube-system
Output: Could not start amazon-efs-mount-watchdog, unrecognized init system "aws-efs-csi-dri"
Mount attempt 1/3 failed due to timeout after 15 sec, wait 0 sec before next attempt.
Mount attempt 2/3 failed due to timeout after 15 sec, wait 0 sec before next attempt.
b'mount.nfs4: Connection timed out'
This likely means your mount target isn't setup correctly. Possibly the security group is not allowing traffic from the EKS cluster.
Model Loading Job
Check to see if there is an ongoing model loader Job.
kubectl get jobs